Category Archives: Christmas

Enjoy Creativity | Colour Combo

Are you reading for a Creative Challenge?

If you’re looking for a fun, creative challenge, look no further— this creative challenge is to come up with a non-traditional Christmas colour combination.

This card uses the following ink colours: Bubble Bath, Lemon Lime Twist, and Orchid Oasis.

To make this card, mix some Bubble Bath Classic Stampin’ Ink Refill with some Shimmery White Embossing Paste.

Place the Abundant Beauty Decorative Mask over some Basic White Cardstock and use a Palette Knife to spread the embossing paste over the mask to create the background.

Stamp your chosen sentiment using Orchid Oasis ink on Bubble Bath Cardstock to match the background.

Stamp some greenery in Lemon Lime Twist ink and use a Blender Pen to bring in more colour from the image outlines.

Pull apart the fibres of some Orchid Oasis Metallic Woven Ribbon and add them behind the greenery.

To finish the card, we add some 2022–2024 In Colour Pearls.

Do you prefer the traditional colours or like to use both and explore different colour combinations?

Enjoy!

Get Creative | Rustic Christmas Countdown Kit

Oh Look!!    Another new kit, isn’t it adorable.

The Rustic Christmas Countdown Kit has all you need to make a rustic, 25 day paper advent calendar. What a great way to bring a classic, cosy Christmas feeling to your home this season! 

Watch the unboxing video to see what’s in the kit.

This kit includes: 

  • Enough supplies to create 25 individual envelopes

  • Printed die cuts, printed labels, adhesive, embellishments, clothespins, and twine

  • Folded envelope size: 4″ x 3″ (10.2 x 7.6 cm)

  • Coordinating colours: Cherry Cobbler, Crumb Cake, Mossy Meadow, Old Olive

Enjoy!

Get Creative | Christmas Everywhere Kit

If you haven’t seen it already on my shop site, the Celebrate Christmas with everyone, everywhere with the Christmas Everywhere Kit is new to the kit collection!

It comes with everything you need to create 9 Christmas cards in 3 festive designs featuring trees from around the world. Get an early start on your Christmas crafting and send some festive cheer to friends and loved ones wherever they are!

Watch the unboxing video to see what’s in the box.

Enjoy

Festive Tags Kit

The all-inclusive Festive Tags Kit £13 | €16 £11.70 (€14.40) during August’s Kits Collection Sale includes everything you need to share Christmas cheer with handmade gift tags.

You’ll get all the supplies needed to make 15 tags (3 each of 5 designs) which range in size from 1½” x 2″ to 2½” x 3″ (3.8 x 5.1 cm to 2.5 x 7.6 cm). The included sentiment stickers and cute wreath, snowman, holly, ornament, and tree imagery printed die-cut elements mean there’s no stamps or ink needed to complete these tags. Embellish your tags with peel-and-stick Gold Dots, finish with Baker’s Twine, and you’ll have handmade tags for the festive season in no time at all. Coordinating Stampin’ Up! colours are Basic Black, Flirty Flamingo, Garden Green, Lost Lagoon, Pool Party, and Real Red.

Your kit is packaged in a 9⅞” x 6½” x 2¾” (25.1 x 16.5 x 7 cm) printed designer box for storage or crafting on-the-go.

It’s so cozy

Have you seen this adorable new kit?  I know some have!   Card making made easy with everything you need in the box.  Great for some craft therapy where you just want to craft out of the box.  Take a closer look with this unboxing video.


The kit includes:

  • Cozy & Bright Photopolymer Stamp Set
  • Acrylic Stamp Block
  • Classic Stampin’ Spot: Poppy Parade
  • Predesigned projects 
  • Step-by-step instructions
  • Precut pieces (No prep work! Get right to crafting). Including printed die-cut sheets: sticker adhesive sheets & non-adhesive sheets
  • Makes 12 cards of 1 design
  • Gold foil accents
  • Folded card size: 5-1/2″ x 4-1/4″ (14 x 10.8 cm)
  • 12 preprinted envelopes
  • Enough adhesive to complete projects
  • Linen thread
  • A 9-7/8″ x 6-1/2″ x 2-3/4″ (25.1 x 16.5 x 7 cm) printed designer box for storage or crafting on the go
  • Product colours: Cajun Craze, Early Espresso, Evening Evergreen, Garden Green, Poppy Parade, Pumpkin Pie

Order yours today, and maybe an extra one for a gift.


Order!

Baking Tray Advent Calendar

I made this ages ago and it’s a fun advent calendar to get out each year. All you need is a flat (if possible) baking tray, ruler, pen, paper, glue, embellishments, a piece of ribbon, something to make a hole and little magnets.

First, decorate the back of the baking tray with some patterned paper.

On another sheet of paper, mark out your advent squares.  I have done my squares approx 1″ in size and they are 5 x 5  – depending on the size of your baking tray you might need to adjust your sizes.  I used a dashed line rather than a solid one to mark this out and then trimmed this sheet of paper down to fit where I wanted it on the tray and stuck it down.

Cut some squares out of cardstock and then decorate.  I have edged my squares with some ink and used what I could find lurking in my embellishment box. Pop a magnet on the back of your squares when you are done.

Advent Calendar

Advent Calendar

I punched some circles out of another patterned paper and stuck some stickers on for the month of December and added these to the top part of the tray.  To hang your tray, punch a hole in the top (I used my crop-o-dile) and then thread some ribbon through.

Advent Calendar


Advent Calendar

A dilemma!

Stampin Up

Here’s a dilemma. You want to make Christmas cards but you don’t want to invest in a stamp set that’s good for just one time of year. What’s a crafter to do?

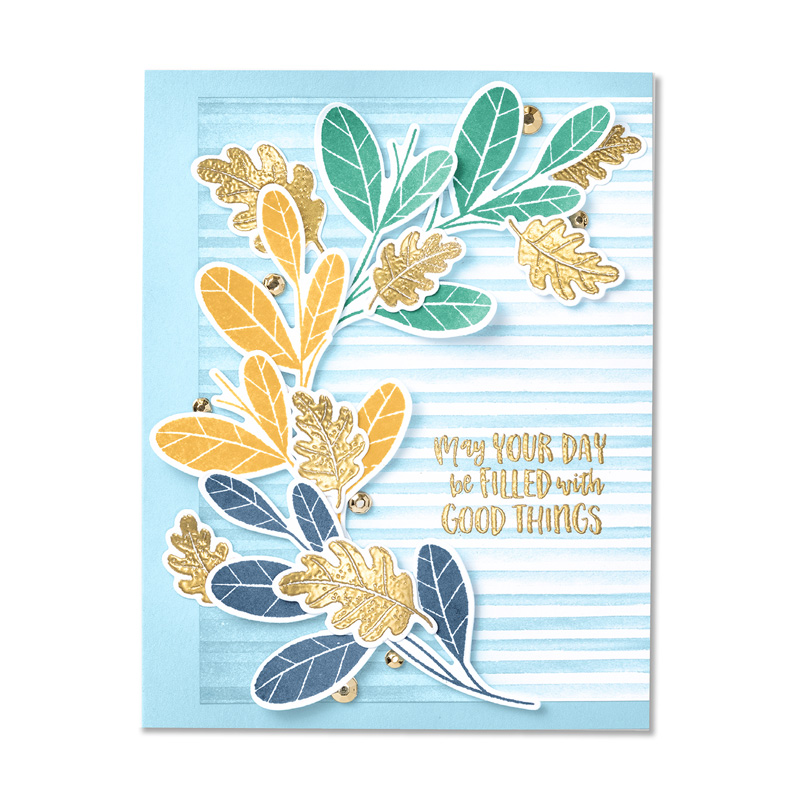
Let me introduce you to the Season’s Blessings Bundle. Stamp a basket full of poinsettias, add the “Season’s Blessings” sentiment, and you have festive Christmas cards. But the fun doesn’t end there! Fill the basket with leaves stamped in reds, yellow, and oranges for autumn cards. Stamp colourful flowers and “May your day be filled with good things” for birthday cards. You can use the stamps in this bundle for almost any occasion. 

Don’t forget the dies! They coordinate with the stamp images for quick cutting. This is a bundle you’ll use all year long!

What will you do with the Season’s Blessings Bundle? It’s not just for Christmas.

Order the stamps/dies and get a free pdf to make the two cards below.

Stampin Up season's blessings

Get Creative | Christmas Season

Stampin' Up! Sarah's Cards Christmas Season

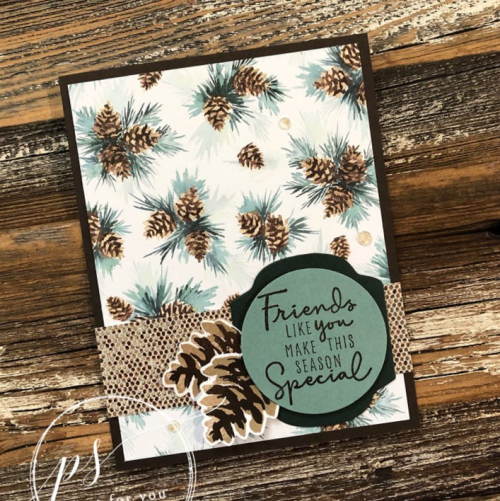
This is such a beautiful bundle and I’m sure you can get creative and use it not just for seasonal creations. It does use some of the paper that was available during Sale-a-bration so, if you don’t have it, have a root through your paper supplies for something that coordinates, or a piece from the painted Christmas papers.

 Supplies: 

Stamps:
Christmas Season Bundle (156801); Christmas to Remember (156300) 

Card Stock:
Early Espresso (119686); Soft Succulent (155776); Evening Evergreen (155574); Basic White (159276); Painted Christmas 12” x 12” Designer Series Paper (156292); Be Dazzling 6” x 6” Specialty Paper (if you don’t have this from Sale-a-bration, raid your stash of pretty papers)

Ink Pads:
Early Espresso (147114); Crumb Cake (147116) 

Misc:
Layering Circles Dies (151770); Wonderful Gems (153536); Bone Folder (102300); Di-mensionals (104430); Stampin’ Cut & Emboss Machine (149653); Stampin’ Seal (152813) 


 Measurements: 

• Early Espresso: 5-1/2” x 8-1/2” scored at 4-1/4” 

• Painted Christmas DSP: 4” x 5-1/4” 

Be Dazzling Specialty Paper (or alternative): 1-1/4” x 4-1/4” 

• Evening Evergreen: 2-3/4” x 2-3/4” cut with label shape die from the Seasonal Labels Dies 

• Soft Succulent: 2-3/4” x 2-3/4” to die cut about a 2” circle 

• Basic White: 4” x 5-1/4” for inside and 2-3/4” x 3-1/4” for stamping 

• Gems: x3 

 Instructions: 

1. Add the dsp to the card front. 

2. Add the strip of be dazzling specialty paper (or alternative) about ¾” from the bottom of the card front. 

3. Add the die cut evening evergreen label shape. 

4. Stamp desired greeting, using early espresso ink, onto the die cut circle. Add that to the card front using dimensionals. 

5. Stamp two of the smaller solid pinecones using crumb cake ink onto the white cardstock. 

6. Stamp the overlay image using early espresso ink, over top. 

7. Die cut. 

8. Add the two pinecones to the card front as shown in photo. 

9. Add three of the gold gems from the Wonderful Gems package. 

10. Stamp desired greeting on the inside layer and add to the inside of the card. 

Parts and Pieces

Tis the season to be jolly—and to start creating hand-stamped Christmas cards to make the season bright! If you’re thrifty, you may want to use parts and pieces that you already have.

Dig into your treasure trove of scraps to see what gems you can find to make unique Christmas greetings—or CASE the cards above using the products featured in these 4-1/4″ x 5-1/2″ (10.8 cm x 14.6 cm) cards:

The same elements are used for each card, but each one is unique by simply moving the elements around.  Cut an angle or banner tip on your papers, and sprinkle some gems.  Get creative!  Switch up colours, add embellishments or some ribbon.   You can just do as you want as there are no rules with being creative.  Just have fun!

Love Santa, tag kit

Let your Christmas gifts take “Santa” stage with Love, Santa— we have a new Kits Collection addition! 

The Love, Santa Tag Kit features oversized Christmas tags in festive designs. This kit has everything you need to create 12 whimsically designed tags. That means you will find printed die-cut tags and labels, sequin embellishments, pink and white baker’s twine, an exclusive stamp set, a Night of Navy Classic Stampin’ Spot, and more in this all-inclusive kit!

You can get right to crafting without any of the prep work. Plus, the printed and food-safe cellophane Love, Santa Treat Bags (available to purchase separately) are the perfect complementary way to wrap up scrumptious treats. 

This new kit will be available 6 October.