Tag Archives: tutorial

Corner Catcher

Quite a while ago (a long time even!) one of the Stampin’ Up! demo magazines had a cute little corner catcher (or bookmark!) in it.  I made a few and gave some away and thought I’d share this with you.  You might want to make one or two for yourself, they are a great little gift idea as well.  This is also handy to raid the scrap box!
 

I have used a 4″ piece of square cardstock as the base for mine. 

Mark it up at 2″ on the top and then the left and right sides. 

Score and fold.


Next, trim a piece of DSP measuring 2″ x 4″ and trim it down as this gets stuck onto the back.


Turn over and then decorate the front.  


And there you go, one corner catcher.  Have fun!  {You might want it a bit smaller so you might find making it a 3″ square is better but I wanted mine big!}

Accordion Spine Mini Book

Revisiting past creations and I have also been asked if I can make one for someone. So, rather than reinvent the wheel, here is how to make a cute mini book.

This mini book is using a ‘very’ retired kit from Stampin’ Up!  It’s great for using up those scraps and stickers you’ve been saving!
 
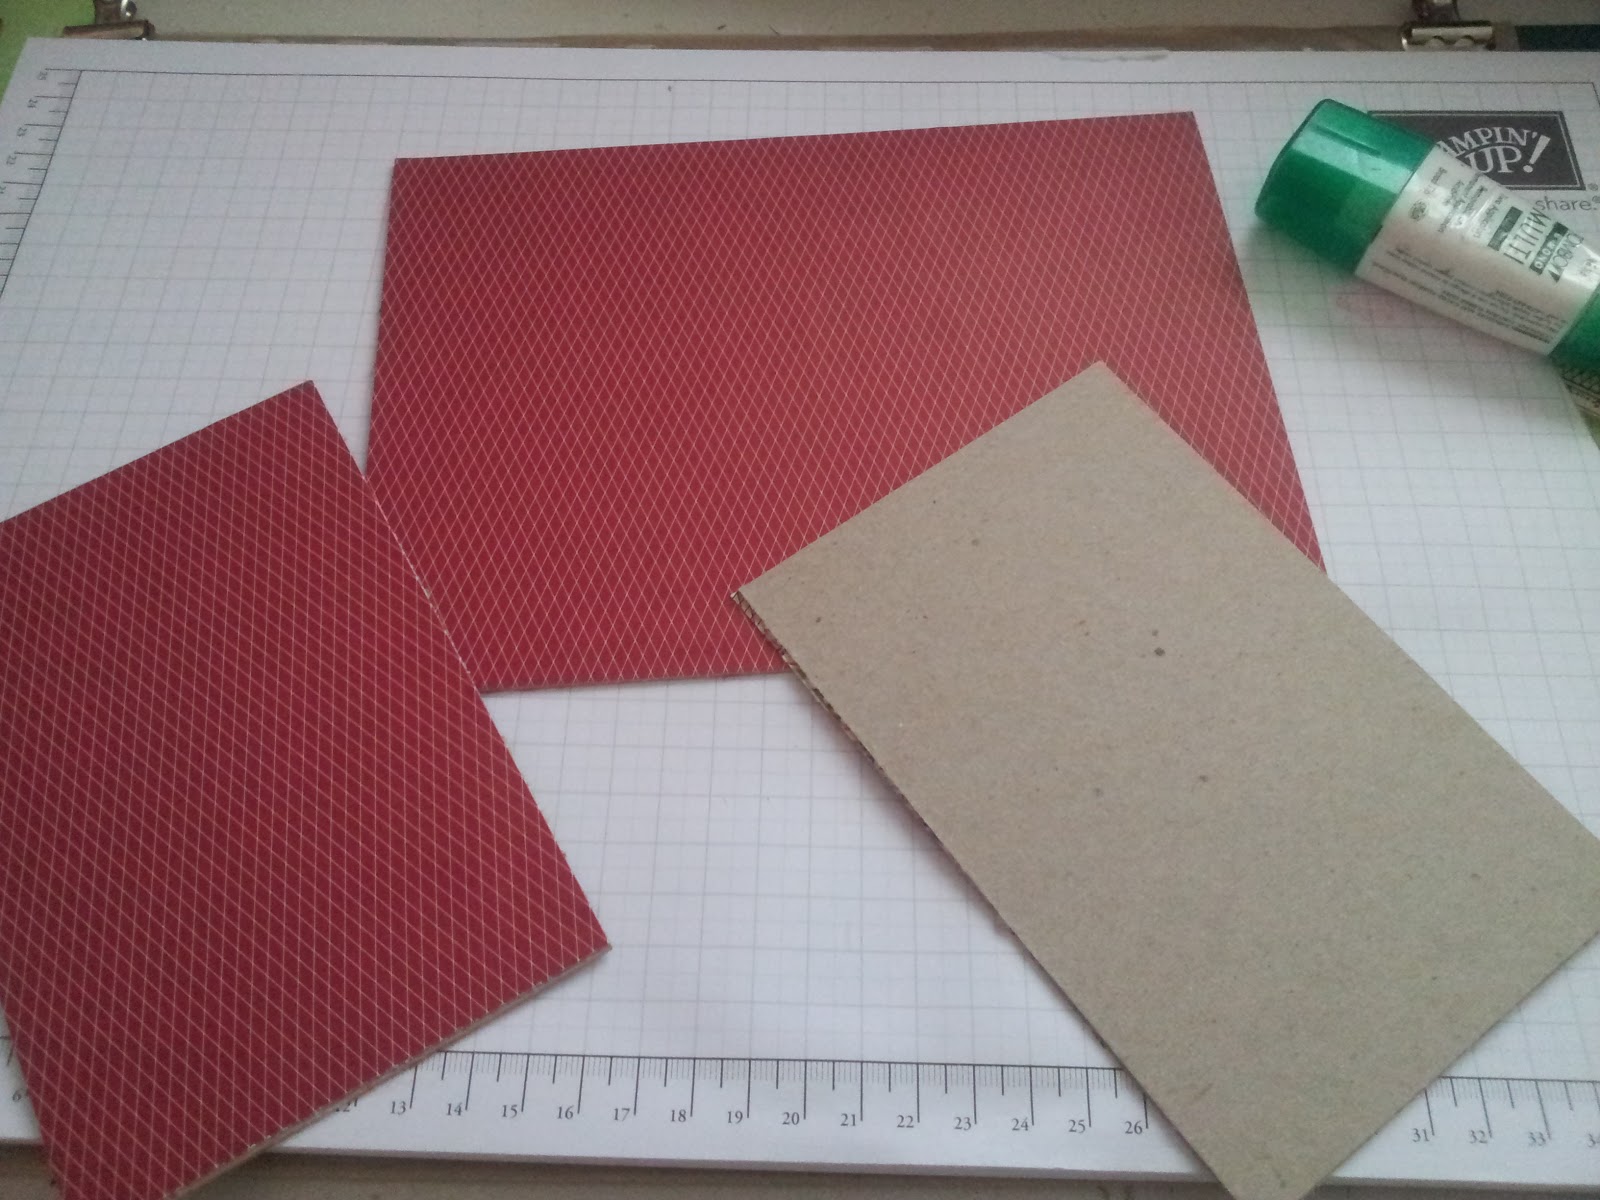
If you don’t have chipboard, upcycle and old box, you just need something sturdy.
 
Ingredients:
Back chipboard cover – 8″ x 6″
Front chipboard covers – 2 sheets cut to 4″ x 6″
Inside concertinas: one sheet of 12×12 cardstock cut in half.

Back cover – two pieces of dsp trimmed to 8×6″ (one for the inside and one for the outside)
Front covers – two pieces of dsp (paper) trimmed to 4×6″
Inside pages –  Cut two sheets in each of the following sizes – these are going to make your inside pages:   12 x 5.5″ / 10 x 5.5″ / 8 x 5.5″ / 7.5 x 5.5″     once cut, fold each piece in half.
Ribbon
Cropadile or other method to punch holes

Instructions 
1. Cover the back of the 8×6″ piece of chipboard and front two pieces of 4×6″ chipboard with dsp.


3. Score each of the 6×12 sheets, score as follows:

4″, 4.75″, 5.5″ 6.25″, 7″ 7.75″, 8.5″, 9.25″, 10″ (score from the same end for both sheets)

 
4. Stick the 2″ end of of the concertina folded paper to the front of the 8×6″ chipboard.


5. Stick the back of the two 4×6″ to the 4″ end of the concertina folded paper.


6. Cover the inside of the back using the other piece of 8×6″ dsp.

7. The insides.

Stick the 12 x 5.5″ on the back concertina folds, then the 10 x 5.5″  ending up with the 7.5 x 5.5″ on the first concertina fold. 


You should end up with something like this:


8. Decoration

I punched a hole in each of the front covers and used some ribbon to create the fastening and decorated the book with some of the elements from the kit on the outside and inside pages.


I hope this inspires you to get creative.  Have a super day.

Get Creative | Way to Goat

sarahs cards

Isn’t this the cutest card.  I also love that you don’t have to stamp a load of bricks as the paper is from the bloom where you are planted papers.  The sentiments in the stamp set make this card fun.  


You can make it too!

Measurements:

  • Cinnamon Cider: 8-1/2” x 5-1/2”, 5-1/2” x 4”
  • Basic White: 5-1/4” x 4” (inside of card); Scraps for all of the images, large enough to die cut
  • Bloom Where You’re Planted Brick Pattern DSP: 5-1/2” x 4”

Instructions:

  1. Fold the large piece of Cinnamon Cider cardstock in half and sharpen the crease with a Bone Folder. Set aside.
  2. Glue the Designer Series Paper to the smaller piece of Cinnamon Cider cardstock. Don’t be stingy as this entire layer will be die cut. 
  3. Using the Stampin’ Cut & Emboss Machine and the Picture This die with the circles, die cut the DSP/cardstock layer. Punch out the circles, and then use the largest Stitched Rectangle to cut around the edge of the layer.  Attach to the card base with Stampin’ Dimensionals.
  4. Stamp the goats and tin can onto scrap Basic White cardstock using Memento ink. Colour the images using Stampin’ Blends as follows:
    1. Dark Cinnamon Cider for the horns (no blending)
    2. Ivory for the wool at the top of their heads
    3. Dark & Light Crumb Cake for their bodies and the can
    4. Dark & Light Polished Pink for the flower
  5. Stamp the ‘cake’ sentiment onto a smaller piece of scrap Basic White cardstock. Carefully ink the ‘… but I’ part of the sentiment and stamp onto scrap white cardstock.  Clean the stamp, and then carefully ink the ‘Ate it’ side of the stamp.  Stamp immediately below the ‘… but I’ words.  You could do this with a Basic Black Stampin’ Write Marker but it’s not difficult to do with the Memento ink pad. 
  6. Die cut each image individually using the Picture This die. Glue all six images onto the card base.
  7. If you’d like, stamp a tin can in the bottom right corner of the larger Basic White cardstock and then attach to the inside of the card.

SUPPLIES – click here to go to the cart*

*depending on when you are visiting, some items may have retired.

Click me to request the pdf tutorial

Get Creative | Tasteful Touches

sarahs cards

Hi there, thanks for stopping by. It’s been a lovely few weeks, hot sun but now I am glad of some rain as the garden plants sure need it. It’s getting close to Genny heading off for her year abroad – there has been a lot to do and I think (haha) that we have finally got on top of what needs to be done, chasing funding, thanking Lincoln Uni for their help as well as it’s been a bit tricky in some cases as she starts in August where UK universities are September/October! Anyway, onwards….

It’s time to get the supplies out and get creative. Here is a lovely card for you with the instructions on how to create it. I hope you like it.

Measurements:

Cinnamon Cider cardstock: 8 1/2” x 5 ½”
Basic White cardstock x 2 : 4” x 2 ½” / 3 ½” x 2 ½”
2 pieces of DSP trimmed to: ½” x 5 ½”

Instructions:

  • Fold the Cinnamon Cider 8 ½” x 5 ½” card stock in half and crease to create your card base.
  • Using Versamark ink, stamp the Forever Fern leaf image randomly over your card front.
  • Using Multipurpose Liquid Glue, adhere 3 DSP strips across the card front.
  • Ink phrase and stamp onto Whisper White. Die-cut using Tasteful Labels die.
  • Ink leaf image from Forever Fern stamp set, first using Bumblebee ink and then brushing Cinnamon Cider ink lightly on top of some sections of the stamp.
  • Die-cut inked leaf image using Forever Flourishing die.
  • Adhere phrase and die-cut leaf to card front using Mini Stampin’ Dimensionals.
  • Create Bumblebee Gingham Ribbon bow and attach to card front using Mini Glue Dot.
  • Add three Elegant Faceted Gems to complete card.

For your convenience, the products used to create the card can be found by clicking here .

Get Creative | Days to Remember

sarahs cards

If you love to make handmade gifts, this is a great set to create a calendar to give as a present. Also, you can use it yourself, you don’t have to gift them all.

If you like to plan and keep a note of special dates, this is a handy little desk calendar as well.  See how it’s made with the Stampin’ Up! tutorial video. 

I just love the Days to Remember Stamp Set which you can find here in the all-occasions stamps aisle.  (You might want to hang on until August 3 – another post will be coming).